



Your exhaust hanging low can be as simple as a torn rubber hanger, or it can mean the pipe shifted after a hit. If you hear scraping, feel vibration, or smell hot fumes when you idle, you need to figure out whether it is hanger sag, an exhaust leak, or a heat shield rattle before you drive it.
Exhaust hanging low is usually caused by failed exhaust hangers, a loose or broken bracket, or a misaligned clamp. Do a quick check for ground contact, then inspect hanger rubber, flange gaps, and fresh soot trails. If it is scraping, fix it immediately.
Exhaust Hanging Low – Quick Triage First

When an exhaust hangs low, it is usually a failed hanger rubber or a loosened or broken bracket, and the pipe can contact the ground under load. Road contact can quickly turn a minor sag into scraped piping, damaged muffler internals, and an exhaust leak. Treat the clearance and heat safety as your first priority before you start guessing parts.
Urgency Check: When To Treat It As “Stop Driving”
Drive only if the exhaust has clearance everywhere and you do not hear fresh metal-on-road contact. If you hear clanging, scrape marks, or smell hot exhaust near the floor, that is a sign the system is moving enough to cause damage.
For example, a loose hanger on many sedans and crossovers can drop the rear muffler enough to catch on speed bumps. That kind of damage often requires more than replacing a rubber mount because the pipe section can shift and leak at a joint.
Safety Checks Before You Jack Anything Up
Exhaust parts can be hot even after a short drive, and rusted clamps can snap when you disturb them. Wear gloves and keep your face out from under the car until you confirm the system is cool.
Insider tip: When a system is hanging low, it can spring up when you relieve tension. Keep your fingers and tools away from pinch points at flanges and hanger rods.
What To Note Right Now: Location, Sound, And When It Happens
Before touching anything, document three things so you do not buy the wrong parts. Location tells you which section is moving, sound type tells you whether it is a hanger issue or an exhaust leak, and timing tells you whether engine torque or road impact is the trigger.
Vibration that feels like it is coming from the seat or floor usually points to a loose or misaligned section, not just a worn rubber mount. In that case, you may find a hanger rod pulled off-angle or a joint that is leaking at a flange.
| What you observe | Most likely direction | Next safest inspection focus |
|---|---|---|
| Clanging or scraping under load | Ground contact, broken hanger, shifted pipe | Check clearance and hanger condition, look for scrape marks |
| Rattle at idle that quiets at steady rpm | Loose hanger/bushing or clamp | Inspect hangers, rubber isolators, and slip-fit joints |
| Hissing near a joint | Exhaust leak at flange/gasket or cracked pipe | Inspect flange faces, soot trails, and cracked welds |
Most Common Reasons It Sags
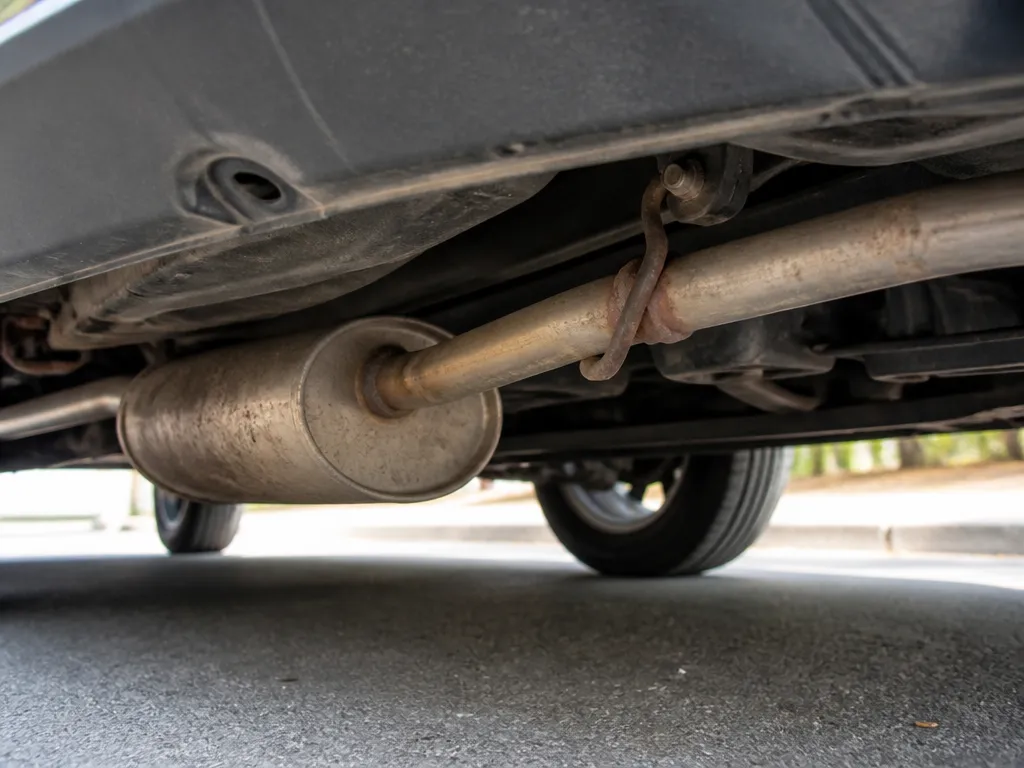
Exhaust components hang low because the support system that keeps the pipes, muffler, and catalytic converter up in the body gets weak or separated. The most frequent cause is failed rubber exhaust isolators or bent/broken hanger brackets that let the system drop a little at a time.
Road impacts and heat cycles also loosen clamps and mounting hardware, and they can move pipes out of alignment so they hang lower under their own weight. Heat shield rattle is another common “it’s sagging” mistake, since the shield can loosen and hang down even when the exhaust is properly supported.
What To Inspect First (Fast, Targeted Checks)
Start with visual checks from the driver-side and passenger-side wheel wells, focusing on where the exhaust is closest to the body. Look for missing isolator rubber, cracked hanger tabs, and clamps that look twisted or have gaps at the joint.
For a quick “is it support or a loose joint” call, grab the muffler and catalyst area with gloves and check for excessive movement. Excess movement at the hangers points to isolator or bracket failure, while movement that concentrates at a joint points to loose bolts, clamps, or misalignment.
Safety call: Do not drive if the exhaust is scraping the ground, the tailpipe angle is extreme, or you smell strong exhaust fumes in the cabin. A dropped system can also cook nearby wiring, floor heat shields, or underbody components.
| Common cause | What you’ll usually notice |
|---|---|
| Rubber isolators/hangers | Tailpipe looks low, muffler or mid-pipe sags, mounts look torn or displaced |
| Bracket damage | Cracked welds, bent hanger straps, exhaust sits crooked or contacts the body |
| Loose clamps/bolts | Joint gaps, recent repair hardware, shifting under light push |
| Misaligned pipes | One section hangs unevenly, repair seams look off-center |
| Loose heat shield | Rattle changes with bumps or RPM, shield appears separated while exhaust height is okay |
For most sedans and crossovers, the usual suspects are the rear muffler isolators and mid-pipe hangers, since they take the hit from curbs and potholes. For trucks and SUVs with longer underbody runs, heat shield failures and clamp looseness are also common because the system sees more road vibration.
Difficulty level for the first inspection is typically “easy,” since it is mostly visual and by-hand movement checks. Actual replacement of hangers or brackets is often DIY-friendly with jack stands and hand tools, but any time you find an exhaust leak at a catalytic converter joint, expect to need careful clamping or a shop if parts are seized or threads are damaged.
Symptoms That Point To The Cause
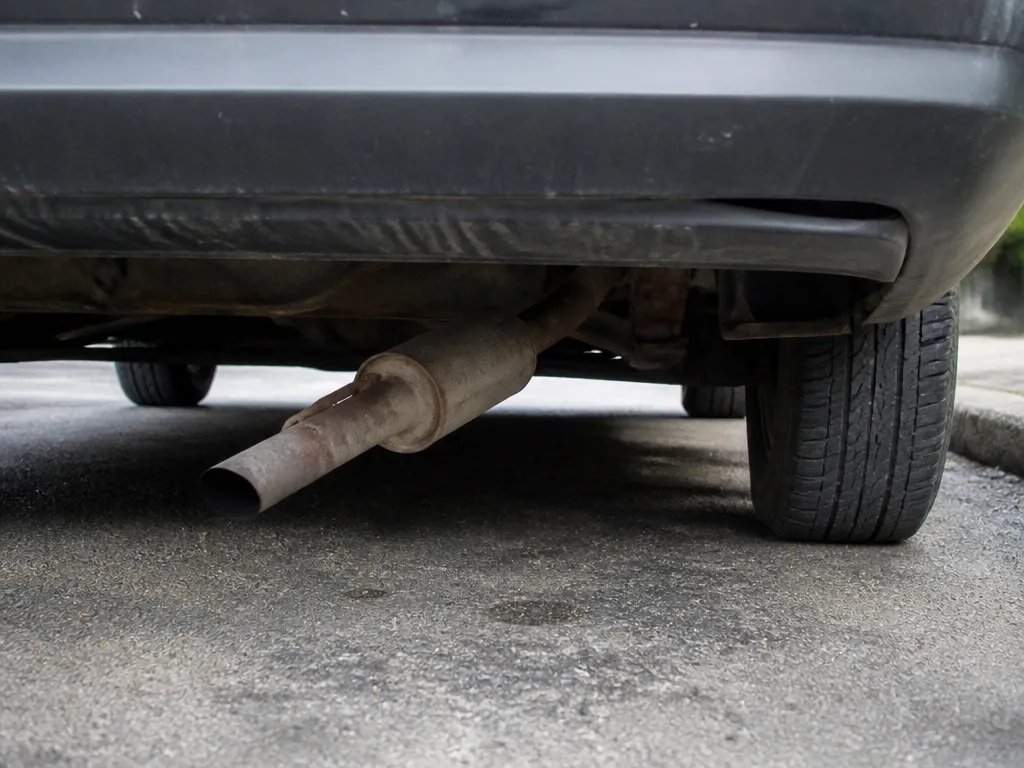
A hanging muffler or tailpipe usually shows up with a repeatable noise, a clear low spot at a contact point, or an exhaust leak smell. The pattern matters, because a sagging hanger makes the exhaust move, while a leak makes hot gas escape at a specific joint or seam.
Quick callout: If the pipe is contacting the ground, drag marks are present, or the exhaust is hanging so low it can strike road debris, treat it as urgent. Driving that way can overheat nearby parts and damage catalytic converters, oxygen sensors, or wiring.
| Symptom you notice | What it usually means | Where to look first | Most likely cause |
|---|---|---|---|
| Rattling on idle or when you accelerate | Exhaust moving because the support is soft or loose | Rubber hanger, bracket bolts, welded support tabs | Worn hanger/bushing, loose clamp, broken bracket |
| Rattle that feels more like “metal on metal” under load | Heat shield is vibrating against the pipe or body | Shield seams, spot weld points, fasteners near muffler/cat | Heat shield fastener loose, shield bent or touching |
| Scraping sound | Something is contacting the floor pan or another underbody surface | Lowest section at the sag point, corners of muffler and resonator | Visible sag at a contact point, collapsed hanger, shifted routing |
| Visible sag at a specific spot | Support failure is pulling that section down | Hanger locations and connection points between pipes | Hanger dropped out of bracket, mount rubber separated |
| Soot around a joint | Exhaust gas leaks under load | Flange gaskets, clamp bands, slip joints | Leaking gasket, cracked flange, loose clamp |
| Burning smell near seams or in the cabin when parked | Hot exhaust escaping close to airflow paths | Cat area, mid-pipe joints, seams above the crossmember | Exhaust leak at a joint, split pipe, failed donut gasket |
| Ticking noise that changes with engine speed | Hot gas escaping and heating the metal near the leak | Flange edges and weld lines | Small leak, warped flange, cracked weld |
| Vibration only in Drive | Load changes the exhaust angle and where it touches or seals | Support points near engine cradle and transmission crossmember | Broken hanger letting exhaust contact only under drive-load, or a leak that opens under load |
Rattling Vs Scraping Vs Shield Buzz
Rattling on idle or during light acceleration usually tracks to the exhaust moving because a hanger, rubber mount, or clamp is loose. Worn rubber mounts let the system shift, and the pipe taps the bracket, floor pan, or nearby heat shield. A quick hint is that the noise often gets worse right when the engine load changes.
Heat shields commonly make a “tinny buzz” or rattle that seems to come from the muffler or catalytic converter area.
For example, a loose shield bolt or a shield edge that’s slipped can tap the muffler body or the pipe every time the engine twists. If the rattle changes noticeably after you tap the shield area with a gloved hand (engine off), you’re usually chasing a shield, not a hanger.
Exhaust Leaks And Why They Show Up At Joints
Exhaust leaks leave clues you can spot even before you put tools on it. Soot staining around flanges, damp black residue near a clamp band, and a noticeable burning smell near seams all point to hot gas escaping rather than the system simply moving.
Ticking often indicates a small leak opening and closing with engine movement and temperature.
In practice, a flange gasket leak can be quiet at steady idle but get louder under acceleration because the pipe expands and the seal loosens.
Vibration Pattern Clues (Why It Only Happens In Drive)
Vibration or rattles that appear only in Drive usually mean the exhaust angle changes when torque is applied. The engine and transmission mounts deflect under load, which changes clearances and where the exhaust rests in relation to brackets and shields.
For instance, a hanger that looks “mostly OK” at rest can still let the system dip just enough in Drive to contact a crossmember or to separate slightly at a joint, creating a leak. That pattern is a strong reason to compare noise in Park versus Drive while listening from underneath at the lowest point.
Underbody Inspection Steps To Follow
Hanging low usually comes from failed exhaust hangers or rubber isolators, or from a bracket that has cracked or come loose. Start with a quick “ground contact” check, then inspect every support point from the front down to the tail section. The goal is to find the first weak link, not replace parts at random.
Quick DIY-friendly call: If you can push the exhaust up and the sag disappears while the rubber isolators show tears or missing mounts, you usually have a hanger/mount repair path. If multiple joints show soot leaks or studs are broken, expect more involved repairs and consider a shop.
| Inspection target | Telltale | What it usually means |
|---|---|---|
| Rubber isolators | Tears, missing mounts, collapsed rubber | Exhaust support failure, drop under load |
| Hanger brackets | Cracks, missing fasteners, bent hanger pin, rub marks | Exhaust not routed correctly, repeated failure risk |
| Flanges and clamps | Flange gap, uneven clamp seating, broken studs | Joint leak and shifting under sag |
| Heat shield clearance | Contact marks, melted spots, shield loose | Heat damage risk and worsening alignment |
Repair Decision Guide By Findings
Loose or failed underbody supports are the most common reason an exhaust droops. Match the symptom you find to the matching parts to avoid wasting time “re-seating” components that are already damaged.
Support, Alignment, And Clamp Checks That Pinpoint The Right Repair
Start by confirming where the exhaust is low: at a single hanger location, along one side, or at a joint. Then inspect hangers and brackets for tears, rusted-through metal, and broken spot welds, and inspect joints for gaps, soot trails, or obvious separation.
Use this quick decision map before you order anything:
| What you find under the car | Most likely cause | Next action | DIY difficulty |
|---|---|---|---|
| Hanger or rubber isolator torn, but joints show no leak | Support failure holding the system down | Replace hangers/isolators and refit to the OEM routing | Easy to Moderate |
| Exhaust shifted or hanging at one side only | Misalignment, wrong clamp, missing hardware | Realign sections, replace damaged clamps, use correct bolts and nuts | Moderate |
| Flange or weld seam leaking (soot line or smell) | Bad gasket, loose joint, or cracked pipe at the seam | Replace gasket and clamp hardware, repair weld, or replace the affected section | Moderate to Hard |
| Muffler, resonator, or catalytic converter dented or torn | Impact damage or failed support causing secondary damage | Replace the affected component and re-check alignment | Moderate |
| Heat shield rattles near the low section | Shield loose from clips or rust | Secure, replace fasteners/clips, or replace shield if holes are enlarged | Easy |
Safety callout: If the pipe is scraping the ground or you see the exhaust contacting anything under load, avoid driving it until you secure the system. A cracked pipe can leak exhaust quickly, and the heat can damage nearby wiring and floor insulation.
For example, a torn hanger rubber can drop the exhaust enough to stress a flange. Fixing only the flange gasket may slow the leak briefly, but the system will keep pulling back out of alignment until the support is replaced.
In practice, watch for these telltales while you’re underneath:
When you find a hanger tear without joint leak, treat it as a support replacement job. When you find a joint leak at a flange or weld seam, treat it as a sealing and integrity job, since a gasket replacement alone does not fix a cracked pipe or a warped flange.
After you choose the repair path from the table, plan to re-check clearance and alignment at the end. Exhaust systems shift as supports settle, and a “tight” clamp that is installed on misaligned tubes can create the next leak location.
Diy Repair Plan For Hangers And Clamps
Exhaust droop is usually a failed rubber isolator, a loose hanger bracket, or a clamp that lost torque after corrosion. A DIY repair works best when the pipe is still straight and the only issue is hanger and clamp hardware. Driving with the exhaust scraping the ground can quickly burn or crack mufflers, flex pipes, and heat shields.
Parts To Buy (Oe-style Vs Universal) And What To Match
Pick OE-style hangers when available for your make and model, because the offset and rubber durometer are usually closer to factory fit. Universal hangers work, but you must match the hanger hole size and the pipe diameter they clamp to, and you may need to fine-tune exhaust height with clamp position.
Buy new exhaust hardware anytime you find rusted studs, cracked brackets, or worn rubber. Use a patch kit mindset: replace the isolators and any bad bolts, and replace corroded clamps rather than reusing them.
| What you replace | What to match | Why it matters |
|---|---|---|
| Rubber isolator/hanger | Mount height, bushing type, bolt/stud size | Prevents repeat sag and avoids exhaust contact |
| Band clamp | Tube OD, clamp width, bolt thread size | Stops leaks at seams |
| Bracket hardware | Correct stud length and bracket position | Keeps exhaust from pulling down at one corner |
Tools And Materials (Do It Right The First Time)
Use jack stands on solid lift points and never rely on a jack alone. Penetrating oil (PB Blaster, Kroil, or similar) helps save seized exhaust fasteners, and you should plan to wear eye protection and gloves because rust flakes and sharp heat-shield edges are common.
Use hand tools you already have, plus a couple exhaust-specific items. Sockets and wrenches for clamp bolts and hanger studs are the core, along with a wire brush, a small pick for rubber alignment if needed, and a paint marker to transfer alignment marks.
Safe Hanger Replacement And Re-seating The Exhaust
Support the exhaust first, because the moment you drop a rubber isolator the system can pivot and stress joints. Place a jack stand or support under the muffler or resonator area (soft wood block between metal and stand) so you can lower the load gently and keep everything aligned.
Align before you loosen. Mark the position of flanges or overlapping joints with a paint stripe, then loosen the clamp or fasteners just enough to separate if the rubber needs to slip out of the hanger path. Install new isolators with the exhaust centered in the hanger, then push the system up to the mark before tightening hardware.
Secure And Re-check (Shake Test, Clearance, And Leak Checks)
After you snug fasteners, do a realignment check before you fully tighten. If the flanges are cocked or the rubber mount is twisted, the exhaust will hang unevenly and start rattling again within weeks.
Tighten band clamps to the spec in your service manual when available, since overtightening can distort flanges and overtightening can actually worsen leaks at thin tubing. Finish with a shake test (grab the tailpipe or muffler and move it side-to-side), then verify clearance to the floor, crossmember, and heat shields.
Shop reality: if the hanger bracket is cracked or the pipe itself is bent, replacing only the rubber and clamps can hide the symptom while the system keeps sagging. Fix the metal alignment first, then hang it correctly.
Cost Range And When To Stop
Exhaust repairs for a sagging system usually cost far less than you fear when the issue is limited to hangers, rubber isolators, or a loose clamp. Typical DIY parts run roughly $20-$150 for hangers and clamps, while a shop commonly lands in the $150-$450 range once labor and cleanup are included.
Cost swings hard based on how far the pipe shifted and how much corrosion the vehicle has. A quick re-clamp on clean metal can be a small bill, but replacing a rusted section, a muffler, or a catalytic converter turns this into a much bigger job fast.
Ballpark Costs You Can Plan Around
| Repair type | Typical parts cost | Typical labor/time | Common total ballpark | DIY difficulty |
|---|---|---|---|---|
| Hanger or rubber isolator replacement | $20-$80 | 0.8-1.5 hours | $100-$300 | Easy-Medium |
| Exhaust clamp replacement or re-clamp | $15-$80 | 0.5-1.2 hours | $90-$250 | Easy |
| Bracket repair or weld patch for small failure | $30-$200 | 1-3 hours | $200-$650 | Medium (shop often) |
| Realignment after section shift | $0-$120 | 1.5-3.5 hours | $250-$900 | Medium-Hard |
| Muffler section replacement | $200-$700 | 1.5-3.5 hours | $450-$1,400 | Medium |
| Catalytic converter replacement (if required) | $800-$2,500+ | 2-5 hours | $1,200-$3,500+ | Shop recommended |
Higher-cost Scenarios That Force A Different Plan
Replacement sections cost more because you often need more than one part. A muffler plus an upstream pipe section, or a converter plus downstream flange work, is common once rust has weakened the joint surfaces.
For example, a vehicle that dragged the exhaust often bends the pipe enough to misalign the flanges and stress the remaining hangers. In that case, repeated “tighten and hope” attempts can leave you paying twice.
Shop-only warning signs show up when the job goes past clamps and fresh hangers. Broken studs and mangled flanges mean you need proper heat control, cutting tools, and alignment work that keeps clearances correct.
When To Stop Diy And Call A Muffler Shop
“If you can’t restore sealing in one clean attempt, the next attempt often turns into grinding, cutting, and replacing anyway. That is when you stop DIY and let the muffler tech take over.”
Prevent Exhaust Sag Next Time
Correct hanger selection and placement is what keeps your exhaust up where it belongs, and it is usually the difference between a one-time fix and the same problem coming back. Exhaust sag also repeats when heat shields loosen, brackets get bent, or the system takes curb and driveway impacts.
Plan to inspect before you reinstall. A quick check of hanger rubber, bracket alignment, and clearance to the floor saves you from chasing the same rattle and scraping again two months later.
Use The Right Hangers, Positioned Exactly
Generic “make it fit” hardware is the fastest path to low exhaust because it changes the suspension geometry. Every muffler and pipe assembly is designed around specific hanger types, angles, and locations along the underbody rails.
| What you find | Likely cause | Prevention step |
|---|---|---|
| Exhaust hangs lower on one side | Wrong hanger type or bracket location | Replace hangers as a set and mount to the factory holes |
| Rubber mount is stretched thin | Excessive system tension or a damaged section | Recenter the exhaust and replace bent pipes, not just hangers |
| Exhaust contacts the body on bumps | Heat shield loose or poor clearance | Secure shields and re-route for clearance before final tightening |
Secure Heat Shields And Keep Them Off The Pipe
Heat shields are thin and easy to bend, so a sagging exhaust can also create a new contact point. After any underbody work, verify the shields are firmly attached and the edges do not touch the muffler, catalytic converter, or flex section.
Heat-shield rattles sound like exhaust leaks, but the fix is usually simple: tighten the shield fasteners, straighten the shield, and confirm at least a finger-width of clearance at normal ride height.
Avoid The Impacts That Start The Cycle
Speed bumps, driveway dips, and curb hits deform brackets and stretch rubber mounts. Exhaust systems usually survive potholes, but they struggle when the lowest part of the pipe takes repeated impacts and the hangers lose their designed height.
“If the exhaust ever dragged the ground, replace any stretched rubber hangers and inspect joints for leaks. A bent pipe can create tension that ruins new mounts.”
Re-check After Prior Exhaust Work And Seasonal Vibration
Any time the system has been removed, welded, clamped, or replaced, the hangers and joints need a follow-up inspection. A fresh alignment can settle after a few drives, especially when the rubber isolators take load and the clamps relax slightly.
Urgent safety callout: If any part is contacting the ground, sparks, burning smells, or repeated scraping show up, do not keep driving it. Ground contact can damage the exhaust pipe, starter wiring, brake lines, and catalytic converter shell.
Quick Summary
Exhaust hanging low usually comes from failed exhaust hangers, a loose or broken bracket, or a misaligned clamp, and it can let the pipe contact the ground, especially under load. Before guessing parts, the article says to treat it like a clearance and heat safety issue and check for hanger sag, exhaust leaks, and heat shield rattle. Watch for ground contact marks, inspect hanger rubber and flange gaps, and look for fresh soot trails. If you hear scraping, feel vibration, or smell hot fumes at idle, stop and figure out what section is shifting.
The urgency is clear: stop driving if the exhaust tube, muffler, or catalytic converter is contacting the ground, if sparks appear under the car, or if severe scraping or clanging happens while driving. Record the location, the sound type, and when it occurs, since idle noise can point to heat expansion or a loose clamp, while acceleration can be engine torque twisting the system. Let everything cool for at least 30 minutes, then inspect from the side first. The single most important takeaway is to address ground contact immediately, because minor sag can quickly turn into scraped piping and exhaust leaks.
| What you notice | Most likely cause | First focus |
|---|---|---|
| Clanging or scraping under load | Broken hanger or shifted pipe | Check clearance and hanger condition, look for scrape marks |
| Hissing near a joint | Exhaust leak at flange or cracked pipe | Inspect flange faces, soot trails, and cracked welds |
| Rattle at idle that quiets at steady RPM | Loose hanger or clamp | Inspect hangers, rubber isolators, and slip-fit joints |
Frequently Asked Questions
Is It Safe To Drive With An Exhaust Hanging Low?
It might be okay for a short trip if it is not hitting the ground and you have no burning smell, but do not keep driving if it is scraping, drooping past the heat shields, or you hear loud rattling. If the pipe is close to wiring, fuel lines, or brake lines, pull over and get it inspected, because exhaust heat can damage nearby components.
What Usually Causes An Exhaust To Hang Low On The Driveway?
The most common causes are broken or stretched rubber hangers, a loose clamp at a joint, or a cracked weld where the muffler or resonator connects. Corrosion at the tailpipe, mid-pipe, or flange area is also a frequent culprit, especially if you have road salt exposure.
How Much Does It Cost To Fix A Hanging-low Exhaust?
Expect a rough range of $150 to $500 for typical hanger and clamp repairs, and higher if you need a section of pipe or a muffler replacement. If rust has taken out flanges, you can easily end up paying for more parts and more labor, so it is worth getting the exhaust inspected in person.
How Long Does It Take To Repair An Exhaust That Hangs Low?
A basic job like replacing rubber hangers or tightening a loose clamp is often a 1 to 2 hour repair. If the muffler or a pipe section has to be cut and replaced, plan on half a day at most shops.
Can I Fix An Exhaust Hanging Low Myself With New Hangers?
You can on many vehicles, because replacing hangers is usually the simplest step, but you still need to verify the pipe is not cracked or the clamps are not failing. Use correct-size hangers and make sure the exhaust clears the body and heat shields, then start the engine and check for new leaks at the joints.
What Is The Most Common Mistake After Replacing Exhaust Hangers?
The biggest mistake is replacing hangers without checking the joints, so the exhaust keeps vibrating and the leak or crack returns quickly. If you see soot around a flange or hear a tick that changes with throttle, stop and address the clamp or damaged pipe, not just the support.