


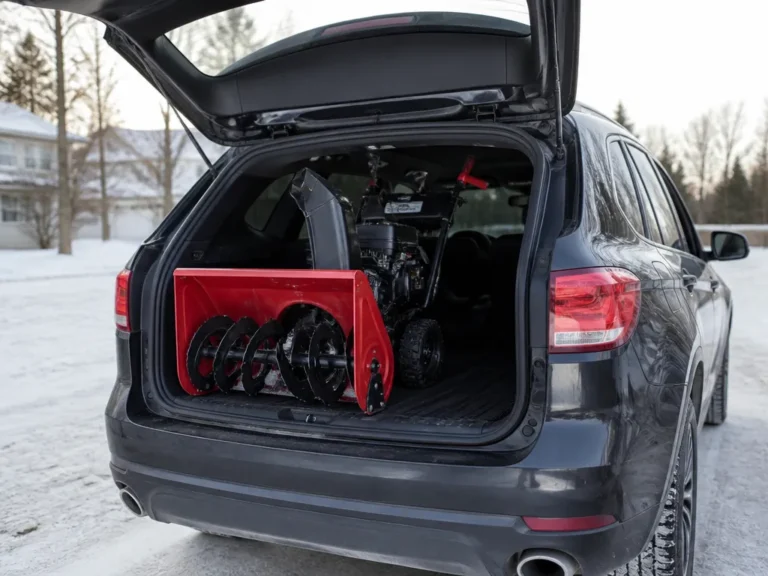
You’ve got a snowblower that’s bigger than your garage space, and your SUV is the only way it gets moved. The problem is deciding whether it rides in the cargo area or needs a trailer, then figuring out how to strap it so the auger and chute never shift during turns and bumps.
Good haul setup is mostly about matching the snowblower weight and dimensions to your SUV’s payload (and hitch towing limits if you tow). You also want proper loading orientation, rated tie-down straps with working load limits, and a fuel-safe, vibration-safe prep before you drive.
Transporting Snowblower With An Suv: Compatibility Primer
Most SUVs can haul a snowblower only within tight limits set by weight, hitch rating, and cargo-floor dimensions. Start by identifying the snowblower’s gross weight and its widest length, then compare those numbers to your SUV’s payload and any hitch or roof transport limits.
Snowblower Weight And How It Changes Your Plan
Snowblowers vary a lot, from compact two-stage units to heavy three-stage machines. A practical rule is this: once you are near your SUV’s payload limit, towing or using a small trailer is safer than trying to cram the unit in the cargo area, especially on uneven roads.
For quick sizing, treat these as “must-check” figures on the snowblower or in the manual: total weight (including auger housing and any cart kit), the handlebar height, and the machine’s overall width and length. If the snowblower comes with filled tires, those also add weight and can shift inside the SUV if not restrained properly.
Vehicle Payload Vs Cargo Load
Your SUV has two different “limits” that people mix up: the gross vehicle weight rating (GVWR) and the usable payload available for you, passengers, and cargo. Cargo that feels “light” in the garage can become too much once you add full fuel, passengers, and tools.
Before loading, calculate your realistic payload using the SUV’s door-jamb sticker (look for GVWR and combined weight capacity). Then subtract your passengers’ and any gear weight to see how much room is left for the snowblower and tie-down hardware.
| What you must check | Where to find it | What can go wrong |
|---|---|---|
| Snowblower weight | Snowblower label/manual | Overloading suspension and tire load rating |
| Available payload | Door-jamb sticker (GVWR/combined weight) | Exceeding GVWR and unstable handling |
| Cargo area dimensions | Owner’s manual + measure your SUV | Can’t secure or forces the unit against trim |
Hitch Class And Towing Rating (If You Go Trailer Or Carrier)
Hitch-mounted transport changes the math. Your SUV’s towing rating is not the same thing as the hitch’s class, and you must treat the lower of the two (plus the trailer or carrier’s capacity) as the ceiling.
For hitch options, know whether your receiver is Class II (often lighter loads), Class III (common for utility towing), or Class IV (heavier). Also check whether your SUV’s towing setup requires brake wiring, a trailer with brakes, or a specific tongue-weight range.
Mechanic tip: If the hitch rating and towing rating disagree, the vehicle’s towing spec wins. If your snowblower is being carried on a hitch cargo platform, the platform’s rated capacity and the tie-down points matter just as much as the receiver class.
Measure Twice Before Loading
Measure the snowblower’s overall length, width, and height with the handlebar position you plan to use. Then measure the SUV’s usable cargo space where the snowblower will actually sit, including any wheel wells and the door opening clearance.
After you get dimensions, plan the tie-down path before the snowblower is in the vehicle. Straps should go to solid anchor points (factory tie-down rings or rated cargo anchors), and the snowblower should be positioned so it cannot slide forward during braking or pivot during cornering.
Payload, Hitch, And Gvwr Checks
Start by checking what your SUV can carry or tow, because a snowblower load can push you past limits even when the vehicle “feels” fine. Use the door-jamb payload spec for cargo inside the SUV, then use the trailer/tongue ratings when you tow a carrier or trailer.
In practice, SUVs with a fully carpeted cargo floor often hide weak-looking anchor areas. Use the factory tie-down hooks or rated lashing points, then run ratchet straps over padding so the snowblower load does not grind into the floor during cornering.
Quick reality check: If you can, weigh the setup at a truck scale before you rely on it. A cheap way to confirm tongue load is using a scale under the hitch area, then compare that number to your payload room.
Cargo Area Load Method
Measure the snowblower first, then plan your lift so the auger and chute stay pointed safely and the weight sits low over the cargo floor. Secure the machine with ratchet straps to solid tie-down points, and protect the SUV’s bumper, trim, and floor with pads or a moving blanket.
Roof Rack Transport: Pros And Cons
Roof-mounted transport can work when your snowblower fits safely within the SUV roof rack system and you can get the weight up there without overworking the cargo area. Roof hauling keeps the inside of the SUV free, but it raises the vehicle’s height and increases wind and handling sensitivity.
When Roof Loading Is Appropriate
Roof transport makes sense when the snowblower cannot fit in the cargo area, when you want to keep the cargo area clean, or when you have a strong, properly rated roof rack with crossbars positioned to support the load. Roof transport is also a good option for smaller two-stage units where you can secure the machine flat and keep the center of mass low on the rack.
Roof transport is a poor fit for wide discharge chutes, long auger housings that cannot be supported by two or more crossbars, or any setup where you must cantilever the machine beyond the rack’s support points.
In practice, the safest roof loads are the ones that sit directly on the rack’s crossbars with straps placed so they resist both fore-aft and side-to-side movement.
Roof Rack Load Limits, Drag, And Real-world Strain
Roof racks have specific static and sometimes dynamic limits, and those limits can be lower than you expect. Always use the rack’s published capacity for the crossbars plus any cargo platform you add, and confirm the SUV’s roof weight rating is compatible with your rack system.
Roof transport increases aerodynamic drag, especially in crosswinds, and that can affect stability and fuel economy. Roof-mounted height also increases the chance of clearance hits, and bumps in parking lots can transfer higher loads into the rack mounting points.
Securing To Roof Rails And Crossbars
Roof rails alone are not the strength you think they are, the rack’s crossbars and mounting brackets are. Strap the snowblower to the rack, not to decorative rail covers, and avoid letting strap hooks contact sharp edges on the machine frame.
In practice, the best setup uses a rigid cargo basket or a roof platform plus an even tie-down pattern. One common approach is to strap the machine at the base in two directions, front-to-back and left-to-right, with protective edge sleeves where straps touch metal.
Height Clearance And Wind Considerations
Roof hauling increases overall height enough to matter, especially with snowblower handles, auger tubes, and discharge chutes. Measure the total height with the machine loaded, then compare it to your route risks like parking structures, bank drive-thrus, and even roadside signage.
Wind is a bigger factor with snowblowers because the discharge chute and handle geometry can act like a sail. Plan for steady acceleration, avoid fast lane changes, and slow down early for crosswinds and rough pavement.
Bottom line: Roof rack transport is viable for compact snowblowers with strong rack capacity and a rigid, well-secured mounting plan, but it carries higher clearance and wind-management demands than a cargo area or trailer setup.
Trailer Towing With Suv
Snowblowers ride best on a small trailer when the unit is too tall or awkward to load safely into the SUV, or when you need more clearance for a proper ramp and tie-down angles. A correctly matched trailer and hitch setup keeps weight off the SUV’s rear axle and reduces sway from bumps and crosswinds.
For example, many people haul a snowblower on an ATV-style utility trailer with a small deck. A hitch-mounted carrier with built-in ramp can work for some units, but you still need enough tie-down reach and a secure trailer connection for bumps and turns.
Weight Distribution And Sway Control
Proper weight distribution keeps the SUV from feeling unstable, which matters when the snowblower’s center of gravity sits high. If your snowblower is heavy in the auger housing, you can reduce sway by moving it slightly forward to increase trailer tongue weight within the safe range and keeping it centered left-to-right on the deck.
In practice, sway starts as soon as the trailer tongue weight is too low or the load is loose enough to shift. Use a sway control hitch or friction-style stabilizer if your towing package supports it, and avoid over-tightening straps that pull the snowblower frame out of alignment on the deck.
Securement Rules And Tie-downs
Securement is what keeps a snowblower from creeping forward when the SUV hits a bump or an abrupt stop. A good tie-down setup uses correct strap strength, the right anchor points, and a tie pattern that resists both forward movement and side-to-side sway.
Strap Type And How To Size Them
Use tie-down straps rated for cargo securement, ideally with soft loops or molded end fittings that won’t abrade metal. Ratchet straps are dependable for steady tension, cam-buckle straps are faster, but cam styles can loosen if the snowblower settles during the first few miles.
Plan around working load limits (WLL), not “max” labels. Target at least a 2:1 safety margin in real hauling conditions, meaning the strap WLL should be roughly double the load you are restraining.
Tie-down Pattern That Actually Prevents Shifting
Anchor points should create a triangle or “X” approach so the snowblower cannot walk forward, back, or sideways. Use at least two independent restraints (front and rear), then add a third on the side-to-side axis if the fit in the SUV is loose.
For most SUV cargo setups, orient the snowblower so the heaviest side faces down and the wheels or skids (if present) sit flat. Then tension straps to pull the snowblower into the floor rails, not to lift it off the cargo area.
Protect Auger, Chute, And Your Suv’s Surfaces
Straps should never bear on the auger housing, scraper blades, or the discharge chute’s plastic deflector. Use padding or a strap cover when crossing over curved metal so you do not dent the housing or create stress points.
Keep tie-down hardware from damaging the SUV interior by using cargo net tracks, factory tie-down loops, or a rated cargo platform with proper tie-down points. Avoid wrapping straps around seat backs or trim pieces that were never meant to take vertical and horizontal load during a hard stop.
Safety And Driving Practices
Shut the snowblower off before any handling, keep fuel leaks contained, and secure the machine so it cannot shift under braking or cornering. Engine-off and fuel safety are non-negotiable because a moving or vibrating unit can loosen tie-downs fast, even over short trips.
Engine Off And Fuel Safety
Engine-off keeps the auger, throttle linkage, and hot muffler from creating burn or pinch hazards while you strap down the snowblower. Fuel safety comes down to preventing spills, vapors, and ignition sources, so wipe any residue and keep rags off the exhaust area.
Before you roll, confirm the engine is off, the fuel cap is secure, and no fuel residue or loose items are present.
Vibration Dampening And Interior Protection
Vibration works tie-downs loose over time, especially on cobblestones, rough roads, or even a parking-lot crawl. Put padding between the snowblower and SUV surfaces to prevent scuffs and reduce metal-to-metal contact (a common failure point on painted cargo floors).
Protect the SUV cabin and cargo area with moving blankets, rubber mats, corner guards, and soft strap covers.
Preventing Airbag And Vent Contact
Place the snowblower so it cannot contact airbags, curtain deployments, or dash vents during a hard stop. Avoid letting any rigid part ride close to the side panels or front footwell areas if cargo space is tight.
In practice, use a clear rule: straps should hold the snowblower to the cargo tie-down points, while the machine should have at least a few inches of clearance from vents and airbag covers. If your SUV has limited cargo space, a hitch-mounted carrier or a properly rated trailer is often safer than forcing the snowblower into the tightest spot.
On-road Checks During The Trip
Do a short “shake-down” check before you leave and again after the first few miles. A quick walk-around takes minutes and catches the loose strap ends, shifted stance, or tarp changes that happen once the tires hit real road load.
Plan your driving to reduce forces on the tie-downs: keep speeds modest, increase following distance, and make turns smoothly. Sudden steering inputs and late braking create sideways loads that can loosen straps and tilt the snowblower, especially when the machine is longer or heavier than you expect.
Quick Summary
Transporting a snowblower with an SUV requires a suitable cargo area, roof rack, carrier, or trailer; safe fuel preparation; and securement that resists movement during braking, cornering, and bumps. Choose the method that keeps the load low, centered, within its ratings, and clear of vehicle safety equipment.
| What to verify | Where it comes from | Why it matters |
|---|---|---|
| Snowblower weight, overall size | Snowblower label or manual | Determines whether cargo-area loading is realistic |
| Usable SUV payload (not just “it fits”) | Door-jamb sticker (GVWR and combined weight capacity) | Prevents exceeding the payload that affects stability |
| Tie-down strength | Strap working load limit, rated anchor points | Helps stop chute or auger movement over bumps |
Frequently Asked Questions
What’s The Safest Way To Load A Snowblower Into An Suv Without Damaging The Bumper Or Rocker Panels?
Use a proper loading ramp so the machine transitions smoothly instead of “bouncing” up onto the hitch or bumper. Plan for a ramp plus secure tie-down points, and keep the snowblower’s weight controlled while you raise it into the SUV cargo area.
Do I Need Ramps, Or Can I Lift And Push A Snowblower Into An Suv?
If the snowblower clears the ground slowly, a ramp is still the safer method because it reduces the “shock load” on the SUV and on your grip. Many people use dual-runner style ramps for better traction during the loading angle change.
How Should I Strap A Snowblower In An Suv So It Won’t Shift While Driving?
Strap the snowblower so it cannot roll or rotate, and pull the straps tight against solid attachment points. Use multiple tie-downs to control direction changes, not just one strap, and double-check they are secure before you move the vehicle.
Will A Hitch Cargo Carrier Work For Transporting A Snowblower With An Suv?
It can, as long as the carrier is rated for the snowblower’s weight and you use the included ramp and tie-down points. Some carriers are listed as supporting up to 500 lbs, but you must verify your specific carrier capacity and the snowblower weight.
What’s The Biggest Mistake People Make When Transporting A Snowblower With An Suv?
The common mistake is skipping traction and ramp support, then loading the machine at too steep an angle. Another frequent issue is under-tightening straps, which allows the snowblower to shift during turns or braking.
Is It Better To Transport A Snowblower Inside The Suv Cargo Area Or On A Hitch-mounted Carrier?
Inside the cargo area is usually simplest for controlling movement if the snowblower fits securely, but a hitch-mounted carrier can work well when clearance or fit is an issue. In either case, the deciding factor is secure anchoring and correct weight rating, not convenience alone.